Register to get immediate access to your dashboard.
Open the Dashboard — Navigate to /dashboard in your browser after signing in.
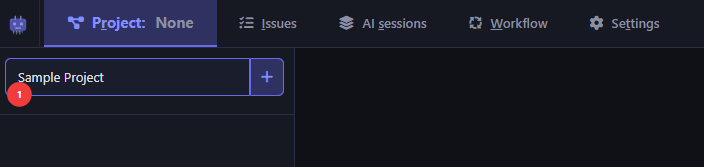
Create a project — Type a project name in the filter box and press Enter. A "Create project" dialog opens.
The project filter bar — type a name and press Enter to create a project.
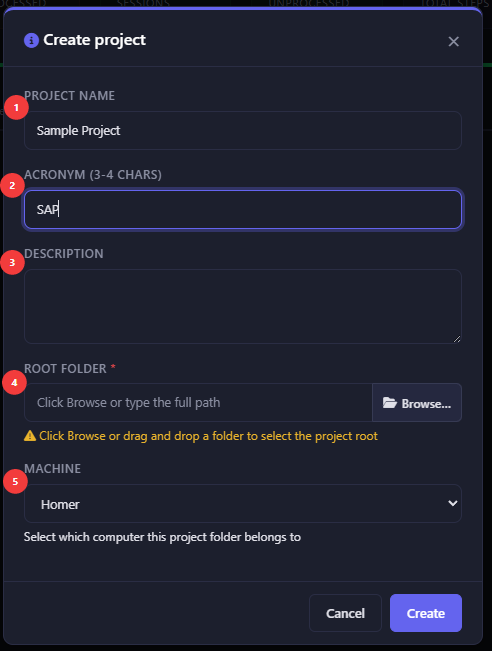
In it enter:
The New project dialog — numbered fields match the steps below.
Project name like "Sample Project"
A short project acronym like SAP — this prefixes issue numbers.
Optionally a description.
Project root folder. Click the 'Browse...' button to open your file system explorer and browse to the root folder of your project.
NOTE: The browser's implementation of file access does not allow the system to report the actual directory, so if you want to remember it within Aisman, copy its path and paste it — after you have selected the root directory — into the text field to the left of the Browse button. If you skip this, everything still works, but the actual folder path won't be displayed in Aisman.
Aisman creates a .aisman folder in the specified root folder to store instructions and exchange files with your agent.
Machine name — Create a new entry or select an existing one if it matches your current computer. This does not have to match the actual computer name, but it prevents collisions of project files checked into version control (Git) when you work on the project from more than one computer.
Project paths are saved per computer.
Why the root folder? Aisman needs access to your project's filesystem so it can read and write the .aisman/inputs/ and .aisman/outputs/ folders that your AI agent uses to receive instructions and deliver results, and to be able to edit coding agents' instruction files. Everything stays on your machine.
Step 2: Configure your AI coding agent
Your AI coding agent (the host) needs to know that it needs to follow the Aisman instructions in order for Aisman to guide it and record results. This is a one-time setup per project.
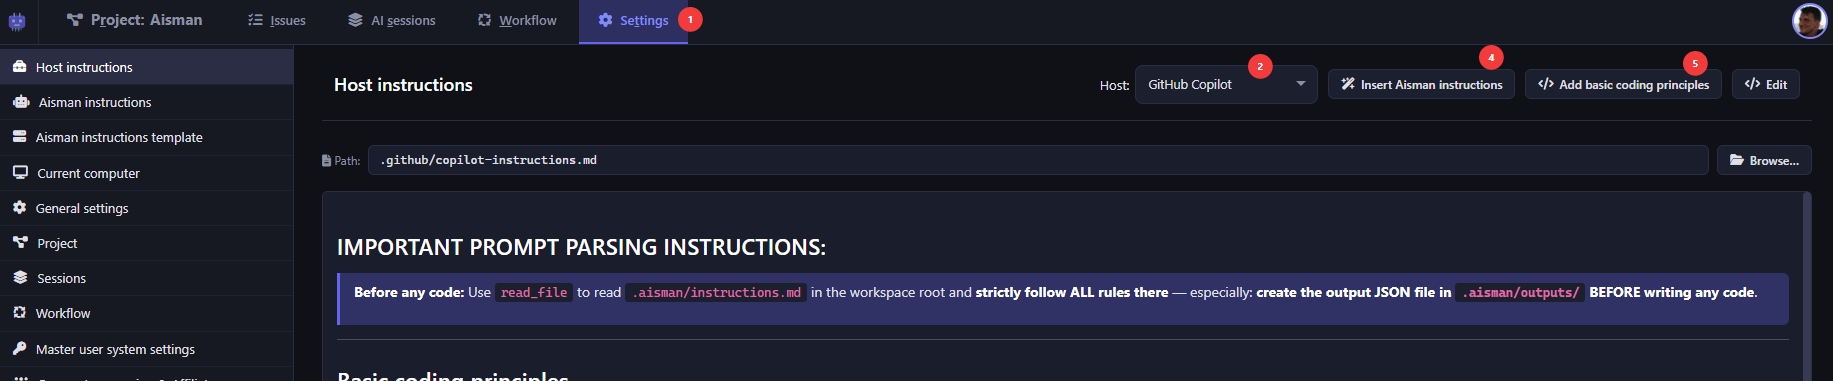
Configuring your AI agent's instruction file — numbered steps correspond to the guide.
Open Settings — Go to Dashboard → Settings → Host instructions.
Select your host — Choose your AI tool from the dropdown (e.g. GitHub Copilot, Cursor, Claude Code). Aisman shows the expected path for that host's instruction file.
Grant file access — If you haven't already, allow Aisman to access your project folder via the browser's File System Access API.
Create or load the file
If no instruction file exists yet, click the + Create file button. Aisman creates it with the correct header that references .aisman/instructions.md.
If the file already exists, click the Insert Aisman instructions button to add the required Aisman directive at the start of the file.
Optionally, add basic coding principles — Click the Add basic coding principles to insert recommended guidelines that help your agent follow best practices. This is just a basic set of helpful coding guidelines to help you start well that has nothing to do with Aisman itself.
Save — Click Save to save the file to disk.
Tip: The .aisman/instructions.md file is the master reference. Your host's instruction file simply points to it—so when Aisman updates instructions, your agent automatically picks up the changes.
Supported hosts out of the box
Using "Custom" you can connect any other instructions file. In fact, you can override any of the predefined locations as well.
Remember: You must Insert Aisman instructions into the instruction file of every AI coding host you want to work with Aisman.
Host
Instruction file path
Aider
CONVENTIONS.md
Amazon Q Developer
.aws\q\rules.md
Claude Code
CLAUDE.md
Cline
.clinerules
Codeium
.codeium/instructions.md
Continue
.continue/config.json
Cursor
.cursor/rules
Gemini Code Assist
.ai\instructions.md
GitHub Copilot
.github/copilot-instructions.md
JetBrains AI
.ai\instructions.md
KiloCode
.kilocode\instructions.md
RooCode
.roo\rules.md
Sourcegraph Cody
.ai\instructions.md
Tabnine
.ai\instructions.md
Windsurf
.windsurfrules
+ [any custom instructions file]
User-defined path
Daily workflow in 4 steps
Every AI coding session in Aisman follows four steps. You can run as many sessions as you need—each one able to selectively pick up where the last step left off.
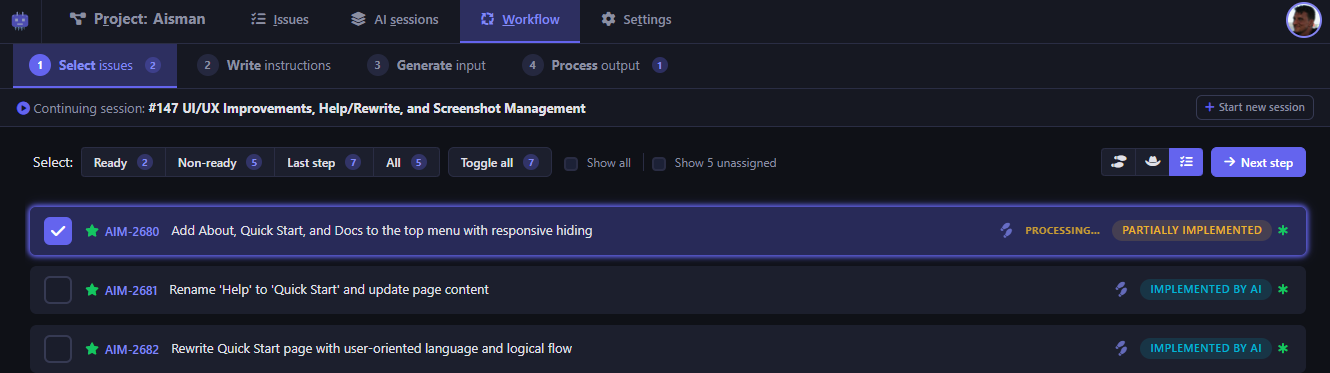
The four workflow steps — each numbered step corresponds to the guide below.
Step 1: Select issues
In the Workflow tab, choose which existing issues to include in the next step. Comment to add extra context, constraints, or corrections. This text is included verbatim in the generated prompt for each issue together with the previous comments and the original issue name and description.
Step 2: Write instructions
Here you can type new free-form instructions—the model will subsequently decompose them into discrete issues alongside the existing ones. No manual issue creation needed. Supports Markdown with preview.
Step 3: Generate input
This steps simply just previews the prompt that the AI agent will receive. Click the Start processing the tasks button for Aisman to put automatically all those selected issues with their full history, relationships, and notes—plus your instructions into both your clipboard as well as to an input file saved in .aisman/users/[you]/inputs/. The file is automatically copied to your clipboard.
Step 4: Process output
Paste the contents of your clipboard into your AI agent's input box and let it work.
During this step Aisman tracks the output file creation and when your agent completes the task and completes the JSON result file that it created in .aisman/users/[you]/outputs/ Aisman detects that automatically and notifies you. On your command the output file is parsed, existing issues are updated, new issues are created, and session and issue histories are recorded. A click on the Review results button takes you back to step one which now shows clearly all the unresolved issues of the current session and clearly marks all pre-existing as well as the new issues that were part of this latest session step. You review the implementation and continue working through the workflow until all issues in the session are successfully implemented.
Output recovery: If the agent generates malformed JSON, Aisman attempts automatic repair or provides a targeted fix-prompt so you can send it back for correction. The correction instructions are placed automatically into your clipboard.
What Aisman gives you
Automatic issue tracking — Write free-form instructions; Aisman decomposes them into discrete, typed issues with statuses and relationships.
Structured prompts — Generate context-rich instruction files that give your agent the full picture of what to do, including dependencies and prior decisions.
Session history — Every AI interaction is recorded step-by-step with outcomes, lines changed, and which issues were touched.
Verification — Output files are automatically checked for errors before results are accepted.
Continuous context — Relationships, statuses, and issue types are tracked across sessions so nothing gets lost between steps.
Audit trail — Every issue links back to the exact session(s) and step(s) that created or modified it, viewable in the Dashboard's Issues, Sessions & Steps, and AI sessions tabs.
Keyboard shortcuts
Aisman provides keyboard shortcuts to speed up common tasks. The most useful ones to get started:
Tab navigation
Shortcut
Action
R
Project tab
I
Issues tab
S
AI sessions tab
W
Workflow tab
T
Settings tab
1–4
Jump to Workflow steps 1–4
F
Focus the current tab's filter box
L
Select the last processed session
Alt+L
Walk backward through step execution history
Ctrl+Alt+L
Walk forward through step execution history
Full-text search (in filter textboxes)
The filter textboxes in Issues, AI sessions, and Workflow stories support full-text search with three modes:
Shortcut
Mode
Display
Description
Ctrl+Enter
Exact phrase
"query"
Searches for the exact phrase as typed.
Ctrl+Shift+Enter
All the words
^query
Searches for results containing all words (AND).
Alt+Enter
Any of the words
~query
Searches for results containing any of the words (OR).
You can also type a prefix directly in the filter box and press Ctrl+Enter:
^ for all-words search, ~ for any-words search.
Markdown formatting (in any text editor)
Shortcut
Action
Ctrl+B
Bold
Ctrl+I
Italic
Ctrl+0
Strikethrough
Alt+U
Underline
Ctrl+Shift+H
Heading cycle (H1→H2→H3→H4→remove)
Ctrl+,
Bullet list
Ctrl+Shift+,
Numbered list
Ctrl+Alt+,
Check list
Ctrl+.
Inline code
Ctrl+Shift+.
Code block
Ctrl+Q
Block quote
Alt+Q
Link
Ctrl+Alt+.
CamelCase inline code
Ctrl+Alt+Shift+.
PascalCase inline code
List editing (in text editors with list items)
Shortcut
Action
Enter
Continue list item with same indentation. On an empty list prefix, removes it.
Tab
Indent list item by 2 spaces.
Shift+Tab
Dedent list item by 2 spaces.
Tab locking (in AI sessions view)
Session and step tabs support a locking mechanism with padlock icons. A locked tab becomes the default for newly loaded sessions or steps.
Shortcut
Action
Ctrl+clickor long-click (300ms)
Toggle lock — primary padlock on the locked tab
Ctrl+Shift+click
Force-lock — red padlock, overrides all loaded sessions/steps
Ctrl+click on locked tab
Unlock — padlock returns to faint open state
Next steps
Video tutorials — See Aisman in action with real-world examples.
Full documentation — Deep dives into every feature, settings option, and advanced workflow patterns.
Screenshots — Browse the interface at your own pace.